
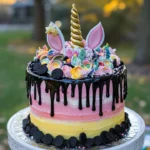
Unicorn Oreo Cheesecake Drip Cake
Unicorn Oreo Cheesecake Drip Cake is a playful and whimsical dessert that is sure to light up any occasion with its vibrant colors and delightful flavors. This cake combines the luscious creaminess of cheesecake with the nostalgic crunch of Oreos, creating a dreamy confection that tastes as good as it looks. This recipe is perfect for gatherings, birthdays, or just to satisfy a sweet craving. With a step-by-step guide, you’ll find that creating this magical dessert is not only easy but also incredibly fun!
Why You’ll Love This Recipe
You’ll adore this Unicorn Oreo Cheesecake Drip Cake for its simplicity and stunning results. The preparation is straightforward, making it accessible even for beginner bakers. This creamy cheesecake is a crowd-pleaser and is perfect for any celebration. With minimal ingredients, it takes advantage of classic flavors to create something truly magical. Plus, the colorful drip and cake decorations make it a feast for the eyes, adding an element of joy to your dessert table.
Ingredients
For the Crust:
- 2 cups Oreo cookie crumbs: The base of our cheesecake, providing a rich, chocolaty flavor and a crunchy texture.
- 1/4 cup butter, melted: Adds a silky smoothness to bind the crumbs together.
For the Cheesecake Filling:
- 4 packages (8 oz each) cream cheese, softened: The star ingredient that gives the cake its creamy and luscious texture.
- 1 cup granulated sugar: Sweet balance that contrasts beautifully with the creamy filling.
- 4 large eggs: Essential for structure and richness.
- 1 cup sour cream: Adds a slight tang, enhancing the flavor profile while keeping it moist.
- 1 teaspoon vanilla extract: Imbues the cheesecake with warm, comforting notes.
- 1 cup crushed Oreos: Adds texture and is an extra surprise in each bite.
For the Drip and Decoration:
- Food coloring (pink, blue, purple, green): To create a vibrant, rainbow effect that will delight all ages.
- 1/2 cup white chocolate chips: Forms the base of the glossy drip, lending a sweet and creamy taste.
- 1/4 cup heavy cream: Ensures the white chocolate ganache has the perfect pourable consistency.
- Whipped cream: A fluffy topping that adds a luxurious feel.
- Unicorn sprinkles: The final touch to make your creation magical and fun.
- Additional crushed Oreos: For added crunch on the top.
Step-by-Step Directions
Step 1: Preheat and Prepare
Start by preheating your oven to 325°F (165°C). Grease a 9-inch springform pan to ensure that your cheesecake releases easily after baking.
Step 2: Create the Crust
In a medium bowl, mix the Oreo cookie crumbs with the melted butter until the mixture resembles damp sand. Press this mixture firmly into the bottom of your prepared pan to form a solid crust.
Step 3: Prepare the Cheesecake Filling
In a large mixing bowl, beat the softened cream cheese and granulated sugar together until smooth and creamy. Next, incorporate the eggs one by one, ensuring each one is beaten well before adding the next. Finally, mix in the sour cream and vanilla extract until fully combined, ensuring a light and airy mixture.
Step 4: Color Your Batter
Divide the cheesecake batter evenly into four bowls. Add a few drops of food coloring to each bowl to create bright, vibrant colors: think pink, blue, purple, and green. Gently fold in the crushed Oreos to each bowl, adding both texture and flavor.
Step 5: Layer the Colors
Pour the colored batter into the prepared pan in a swirl pattern. Feel free to use a toothpick or a skewer to create more swirls and blend the colors slightly; this will give your cheesecake an artistic look.
Step 6: Bake and Cool
Bake the cheesecake for 55-65 minutes, or until the center is almost set but still slightly jiggly. Once done, turn off the oven and let the cheesecake cool for about 1 hour with the oven door ajar. This gradual cooling process helps prevent cracking.
Step 7: Prepare the Drip
While the cheesecake cools, make the chocolate drip. In a small saucepan, heat the heavy cream until just boiling. Pour it over the white chocolate chips in a separate bowl and let it sit for 2-3 minutes. Stir until smooth and shiny. Divide this mixture into four bowls, adding food coloring to each bowl to match the cheesecake.
Step 8: Decorate with Drips
Once the cheesecake is completely set, drizzle the colored chocolate over the edges of the cake to create a fun drip effect. This adds a visually appealing aspect to your dessert!
Step 9: Final Touches
Top your Unicorn Oreo Cheesecake with fluffy whipped cream, a sprinkle of unicorn-themed sprinkles, and additional crushed Oreos for that delightful crunch.
Tips & Tricks
- For an even creamier texture, ensure your cream cheese is at room temperature before mixing. This prevents lumps and creates a smoother batter.
- Experiment with different food coloring brands, as some may yield more vibrant results.
- To make cutting easier, run a knife under hot water and wipe it dry before slicing the cheesecake. This ensures clean pieces.
Serving Suggestions & Pairings
This Unicorn Oreo Cheesecake Drip Cake is perfect for birthdays, school parties, or any festive occasion. Pair it with an ice-cold glass of milk or a dollop of vanilla ice cream for the ultimate dessert experience. Garnish with fresh berries or fruit to balance the sweetness and add a touch of natural flavor.
Nutritional Information
A slice of Unicorn Oreo Cheesecake contains approximately 400 calories, along with essential nutrients from the cream cheese and eggs. While this dessert is indulgent, enjoy it in moderation, balancing it with fresh fruits or lighter meals throughout the day.
Storing Tips & Variations
Store any leftovers in an airtight container in the refrigerator for up to 5 days. If you need to freeze it, wrap slices tightly in plastic wrap and then place them in a freezer-safe container. Thaw overnight in the fridge before serving. For variations, consider using different cookie crumbs for the crust (like golden Oreos for a lighter flavor) or experimenting with flavored extracts, such as almond or peppermint.
Conclusion
This Unicorn Oreo Cheesecake Drip Cake is not just a treat for the taste buds but also a delightful feast for the eyes. Its rainbow colors and enchanting flavors make it a perfect dessert for any occasion. I encourage you to try this recipe and get lost in the magic of baking! Share your experience and any creative touches you added to make it your own.
FAQs
1. How long does it take to make the Unicorn Oreo Cheesecake Drip Cake?
From start to finish, including baking and cooling time, expect to spend about 6 hours, primarily due to the chilling time required after baking.
2. Can I make this cheesecake ahead of time?
Absolutely! You can make the cheesecake a day in advance and let it chill overnight, allowing the flavors to meld beautifully.
3. Is the cheesecake suitable for freezing?
Yes, this cheesecake freezes well! Just ensure it is well wrapped and stored in a freezer-safe container.
4. Can I substitute the cream cheese?
While cream cheese gives this cheesecake its classic texture, you can experiment with mascarpone for a different flavor profile, though the texture will differ slightly.
5. What if I don’t have food coloring?
If you want to skip the food coloring, you can keep the cheesecake as is or use natural alternatives like pureed fruits or berry powders for a hint of color and flavor.
Unicorn Oreo Cheesecake Drip Cake
Ingredients
For the Crust
- 2 cups Oreo cookie crumbs Provides a rich, chocolaty flavor and a crunchy texture.
- 1/4 cup butter, melted Adds a silky smoothness to bind the crumbs together.
For the Cheesecake Filling
- 4 packages (8 oz each) cream cheese, softened The star ingredient for creamy texture.
- 1 cup granulated sugar Sweet balance for the filling.
- 4 large eggs Essential for structure and richness.
- 1 cup sour cream Adds moisture and tang.
- 1 teaspoon vanilla extract Imbues cheesecake with warm notes.
- 1 cup crushed Oreos Adds texture and surprise in each bite.
For the Drip and Decoration
- Food coloring (pink, blue, purple, green) For vibrant, rainbow effects.
- 1/2 cup white chocolate chips Forms the base of the glossy drip.
- 1/4 cup heavy cream Ensures proper pourable consistency for ganache.
- Whipped cream Adds a luxurious topping.
- Unicorn sprinkles Final touch for decoration.
- Additional crushed Oreos For added crunch on top.
Instructions
Preparation
- Preheat your oven to 325°F (165°C) and grease a 9-inch springform pan.
Create the Crust
- Mix Oreo cookie crumbs with melted butter until resembling damp sand, then press into the bottom of the prepared pan.
Prepare the Cheesecake Filling
- Beat softened cream cheese and granulated sugar together until smooth. Add eggs one by one, then mix in sour cream and vanilla extract until fully combined.
Color Your Batter
- Divide cheesecake batter into four bowls and add food coloring to create vibrant colors, then fold in crushed Oreos.
Layer the Colors
- Pour colored batter into the prepared pan in a swirl pattern, using a toothpick or skewer to create more swirls.
Bake and Cool
- Bake cheesecake for 55-65 minutes, then cool in the oven with the door ajar for about 1 hour.
Prepare the Drip
- Heat heavy cream until boiling, pour over white chocolate chips, let sit for 2-3 minutes, then stir until smooth. Divide and color for drips.
Decorate with Drips
- Once cheesecake is set, drizzle colored chocolate over the edges to create a drip effect.
Final Touches
- Top cheesecake with whipped cream, unicorn sprinkles, and additional crushed Oreos.