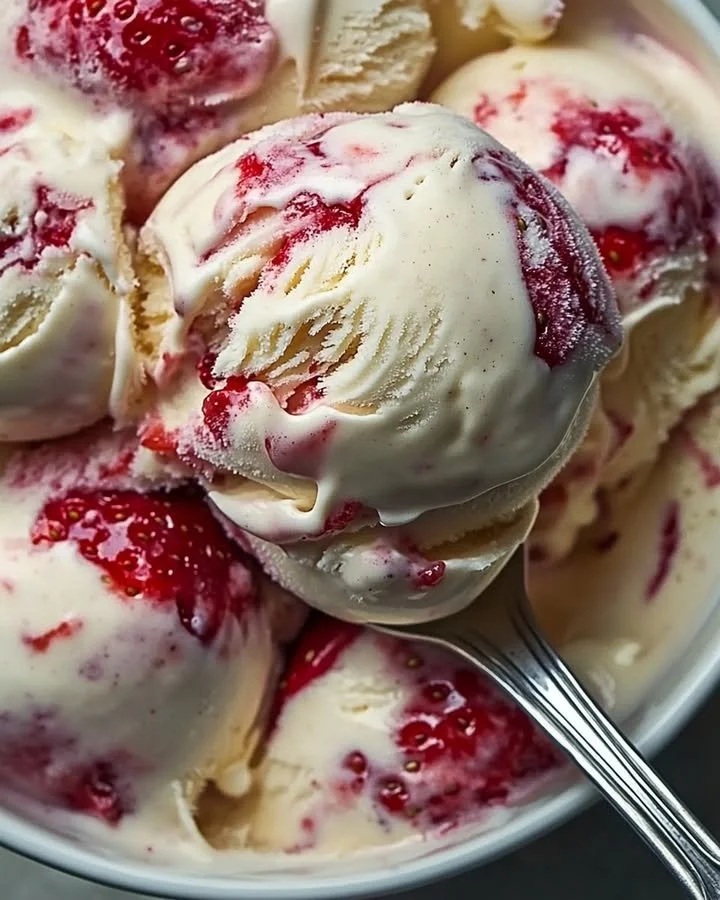
Homemade Strawberry Vanilla Bean Ice Cream
There’s something incredibly fulfilling about creating your own dessert, especially one as delightful as Homemade Strawberry Vanilla Bean Ice Cream. This recipe invites you to engage in a step-by-step endeavor that will awaken your senses with the lush aromas of fresh strawberries mingling with the rich, creamy tones of vanilla. Picture a warm summer afternoon, the sun setting gently in the sky, and the promise of a refreshing scoop of homemade ice cream waiting just for you. Let’s dive into this delightful journey of making a frozen treat that captures the essence of summer with every creamy bite.
History / Fun Fact
The delightful combination of strawberries and cream dates back centuries, with origins traced to ancient Rome where strawberries were celebrated for their flavor and medicinal properties. However, the concept of ice cream as we know it began taking shape in the 17th century, evolving alongside the introduction of new ingredients like cream and sugar. Farmers would often create their own versions using whatever fresh fruits were in season. Enter the strawberry, a favorite fruit that pairs beautifully with vanilla. This delightful ice cream not only bursts with nostalgia but also embodies the enduring joy of sweet summer memories shared with family and friends.
Ingredients
Creating the perfect Homemade Strawberry Vanilla Bean Ice Cream requires a handful of simple yet luxurious ingredients:
- 2 cups heavy cream: Rich, thick, and decadently creamy, this is the heart of your ice cream.
- 1 cup whole milk: Adds a velvety texture that balances the richness of the cream.
- 3⁄4 cup granulated sugar: Sweetness that enhances the flavors, creating that perfect dessert indulgence.
- 1 vanilla bean (or 2 tsp vanilla extract): Aromatic, fragrant, and full of tiny black seeds, providing a depth of flavor that elevates the ice cream.
- 4 large egg yolks: A golden touch that adds creaminess and richness to the base.
- 1 1⁄2 cups fresh strawberries, chopped: Juicy, vibrant, and bursting with flavor; they’re the star of this dessert!
- 1⁄4 cup granulated sugar (for strawberry swirl): A touch more sweetness to balance the tartness of the strawberries.
- 1 tsp lemon juice: Bright and zesty, it enhances the strawberry flavor and adds freshness.
Each ingredient plays a pivotal role in creating a smooth, rich ice cream that’s a joy to savor.
Cooking Time & Tips for Homemade Strawberry Vanilla Bean Ice Cream
Creating homemade ice cream can be done quickly with a few shortcuts or allowed to unfold slowly for richer flavors. Opt for the quick method if you’re short on time; however, the slow method allows for deeper incorporation of flavors, resulting in a creamy texture and robust vanilla essence.
Tip for Success: Always cool your ice cream base completely in the fridge before churning. This ensures a creamy texture without ice crystals. Use the freshest strawberries you can find; they should be sweet and fragrant to make the most out of your ice cream.
Step-by-Step Directions
Make the Strawberry Swirl
To begin creating your luscious ice cream, start with the strawberry swirl. In a small saucepan, combine 1 1⁄2 cups of chopped fresh strawberries, 1/4 cup of sugar, and 1 teaspoon of lemon juice. Cook over medium heat for about 10 minutes, stirring occasionally, until the strawberries soften and release their juices. As the fragrant aroma fills your kitchen, use a fork or potato masher to gently mash the mixture to your desired swirl consistency. Let this sweet mixture cool, and then refrigerate it until you’re ready to incorporate it into your ice cream.
Prepare the Ice Cream Base
Now, shift your focus to the ice cream base. In a saucepan, combine 1 cup of whole milk, 2 cups of heavy cream, and half of the sugar (about 3/8 cup). Warm this mixture over low heat and take the time to scrape the seeds from your vanilla bean into the mixture; toss the pod in for extra flavor. As the mixture simmers, relish the enticing vanilla aroma that fills the air. In a separate bowl, whisk together 4 egg yolks and the remaining 3/8 cup of sugar until pale and creamy. Slowly pour the warm milk mixture into the egg yolks while continuously whisking to avoid curdling.
Return this new mixture to the saucepan and cook over low heat, stirring constantly until it thickens enough to coat the back of a spoon. This may take about 5 to 7 minutes. Once thickened, strain it into a bowl to remove any solids, then cover and chill for at least 4 hours or overnight for the best flavor.
Churn the Ice Cream
Once your ice cream base is thoroughly chilled, it’s time for the fun part! Pour the base into your ice cream maker and churn according to the manufacturer’s instructions. In the last 5 minutes of churning, gently fold in the chilled strawberry swirl you created earlier. As the ice cream maker does its magic, watch the vibrant pink fruit ribbons intertwine with the creamy base, a feast for the eyes and nose alike.
Freeze & Serve
Transfer the churned ice cream into a lidded container. Let it freeze for at least 4 hours to achieve that perfect scoopable texture. Serve it in crispy cones, delicate bowls, or simply enjoy a scoop straight from the container. Each spoonful will envelop your taste buds in creamy, fruity delight, making each bite an indulgent experience.
Serving Suggestions & Occasions
Your Homemade Strawberry Vanilla Bean Ice Cream is an exquisite treat for various occasions. Serve it at summer barbecues in a cone adorned with a fresh strawberry for a vibrant touch. Delight guests at birthday parties by layering it with chocolate cake. Or, take a bowlful on a cozy evening while watching a movie. The versatility of this ice cream knows no bounds, making it a perfect fit for any gathering or a simple self-treat after a long day.
Common Mistakes for Homemade Strawberry Vanilla Bean Ice Cream
- Not chilling the base properly: Skipping this step can lead to icy texture.
- Over-churning: Churning for too long can cause the ice cream to become too firm.
- Using imitation vanilla: Always go for pure vanilla for the best flavor experience.
- Not straining the mixture: Failing to strain can lead to a grainy texture from the cooked yolks.
- Neglecting to use fresh strawberries: Overripe or bland strawberries can diminish the ice cream’s flavor.
Healthier Alternatives & Variations
If you’re looking to lighten things up, consider substituting half of the heavy cream with coconut milk, which provides a lighter, dairy-free alternative. For a twist, incorporate different fruits like peaches or raspberries, or add in chocolate chips for a delightful crunch. You can also reduce sugar by using honey or a sugar substitute to cater to health-conscious individuals without sacrificing too much flavor.
FAQs
1. Can I use frozen strawberries instead?
Absolutely! Just keep in mind that frozen berries may have more water content and can affect texture.
2. Can I make this ice cream without an ice cream maker?
Yes! Pour the mixture into a shallow dish, freeze it, and stir every 30 minutes for a few hours until fully frozen.
3. How long will this ice cream last?
Generally, it can be stored in the freezer for up to two weeks if properly sealed.
4. Can I use other flavors besides vanilla?
Definitely! You can experiment with other flavor extracts like almond or mint for delicious variety.
5. Is it possible to make it egg-free?
Yes, you can omit the egg yolks, but you may want to add cornstarch to thicken it.
6. What can I serve with this ice cream?
Fresh fruit, chocolate sauce, or even a sprinkle of nuts makes for excellent toppings to enjoy alongside your ice cream.
Conclusion
There’s an undeniable magic that happens when you create something as beloved as Homemade Strawberry Vanilla Bean Ice Cream in your kitchen. With its bursts of fresh strawberry flavor and the indulgent creaminess from the vanilla bean, it’s a timeless treat that you’ll want to revisit again and again. So, roll up your sleeves and immerse yourself in this delightful step-by-step recipe; your taste buds will thank you! Try it today, and savor the exquisite joy of this summer treasure.
Homemade Strawberry Vanilla Bean Ice Cream
Ingredients
Ice Cream Base
- 2 cups heavy cream Rich and creamy base.
- 1 cup whole milk Adds velvety texture.
- 3/4 cup granulated sugar Sweetness for the ice cream.
- 1 vanilla bean (or 2 tsp vanilla extract) For enhanced flavor.
- 4 large egg yolks Adds creaminess to the base.
Strawberry Swirl
- 1 1/2 cups fresh strawberries, chopped Main flavor component.
- 1/4 cup granulated sugar To balance tartness of strawberries.
- 1 tsp lemon juice Enhances strawberry flavor.
Instructions
Make the Strawberry Swirl
- In a small saucepan, combine chopped strawberries, sugar, and lemon juice. Cook over medium heat for about 10 minutes, stirring occasionally until softened. Mash to desired consistency and cool.
Prepare the Ice Cream Base
- In a saucepan, combine whole milk, heavy cream, and half of the sugar. Warm over low heat and scrape the seeds from the vanilla bean into the mixture.
- In a separate bowl, whisk egg yolks and remaining sugar until pale. Slowly pour warm milk mixture into egg yolks, whisking continuously.
- Return to saucepan and cook over low heat, stirring until it thickens (about 5-7 minutes). Strain into a bowl, cover, and chill for at least 4 hours or overnight.
Churn the Ice Cream
- Pour the chilled base into an ice cream maker and churn according to manufacturer's instructions. In the last 5 minutes, fold in the strawberry swirl.
Freeze & Serve
- Transfer the churned ice cream into a lidded container and freeze for at least 4 hours before serving.
- Serve in cones, bowls, or straight from the container for a delightful treat.